
You can organize all your articles, podcasts and videos into collections. This can happen automatically or manually. There is no limit on how many collections you can create or on how many items can be added to one collection. Also, each content item can be in multiple collections at once.
1. Creating Collections
To create a collection, go to the Collections section and click “Create collection”.
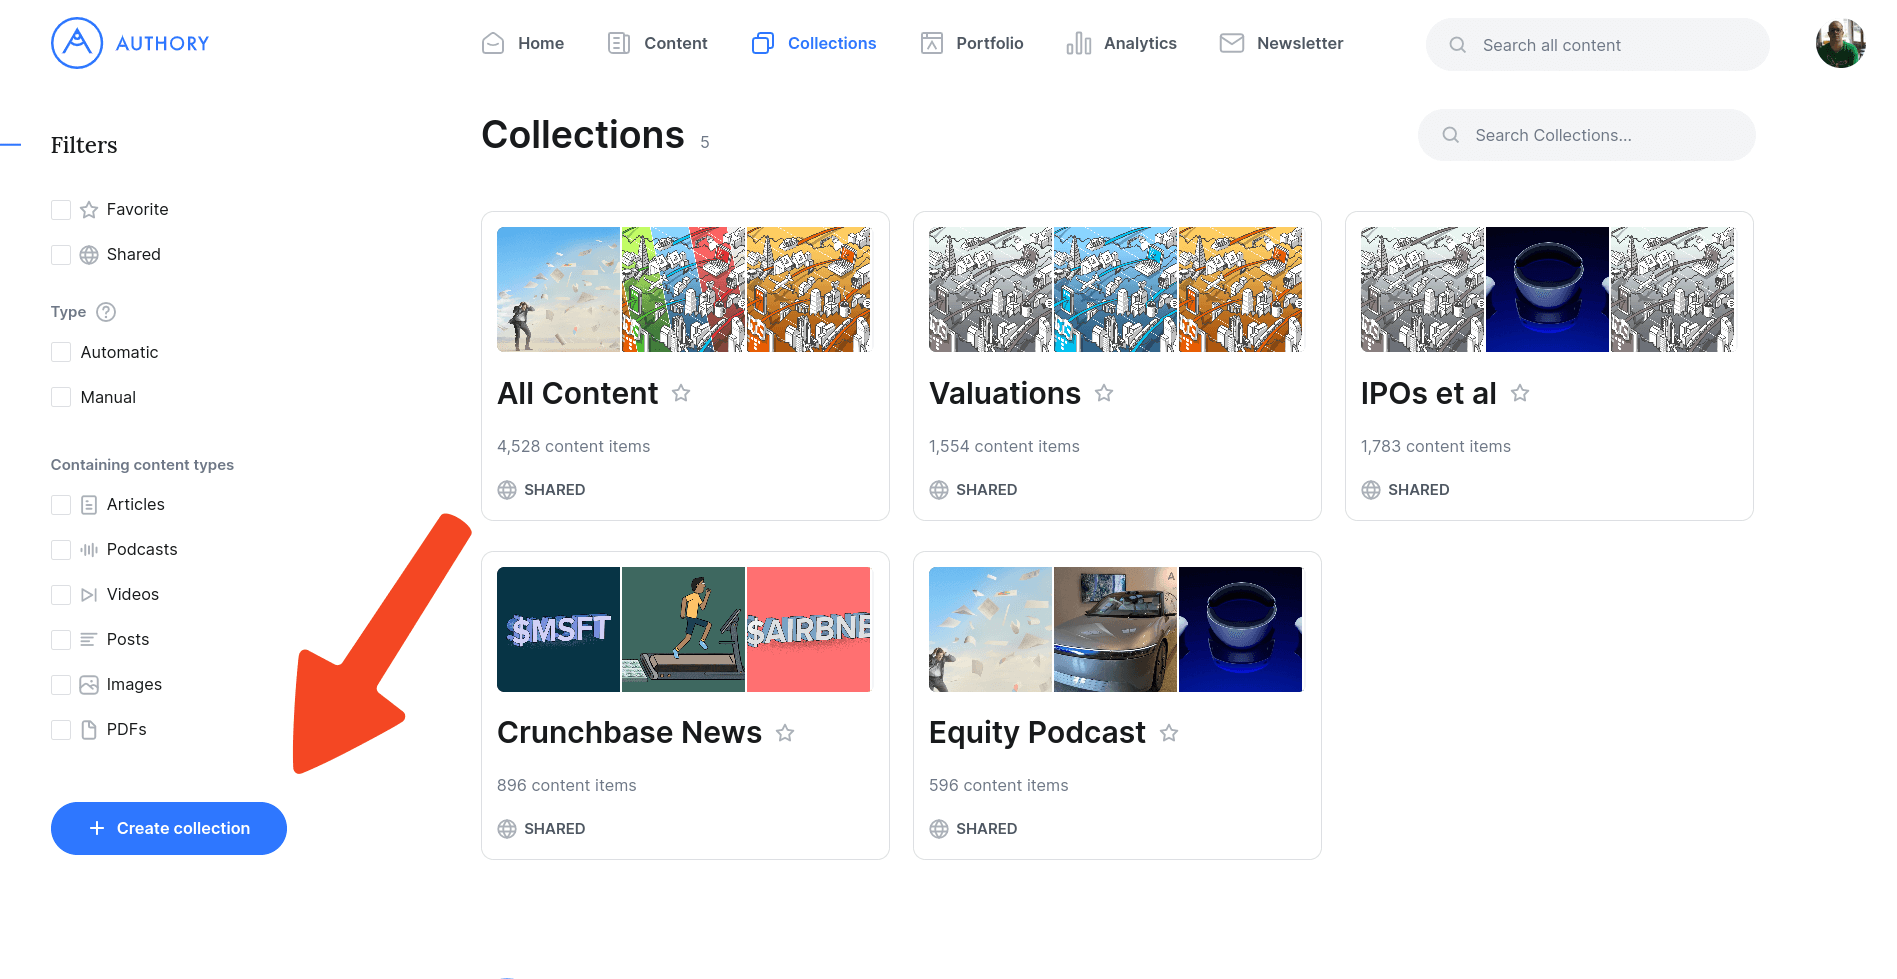
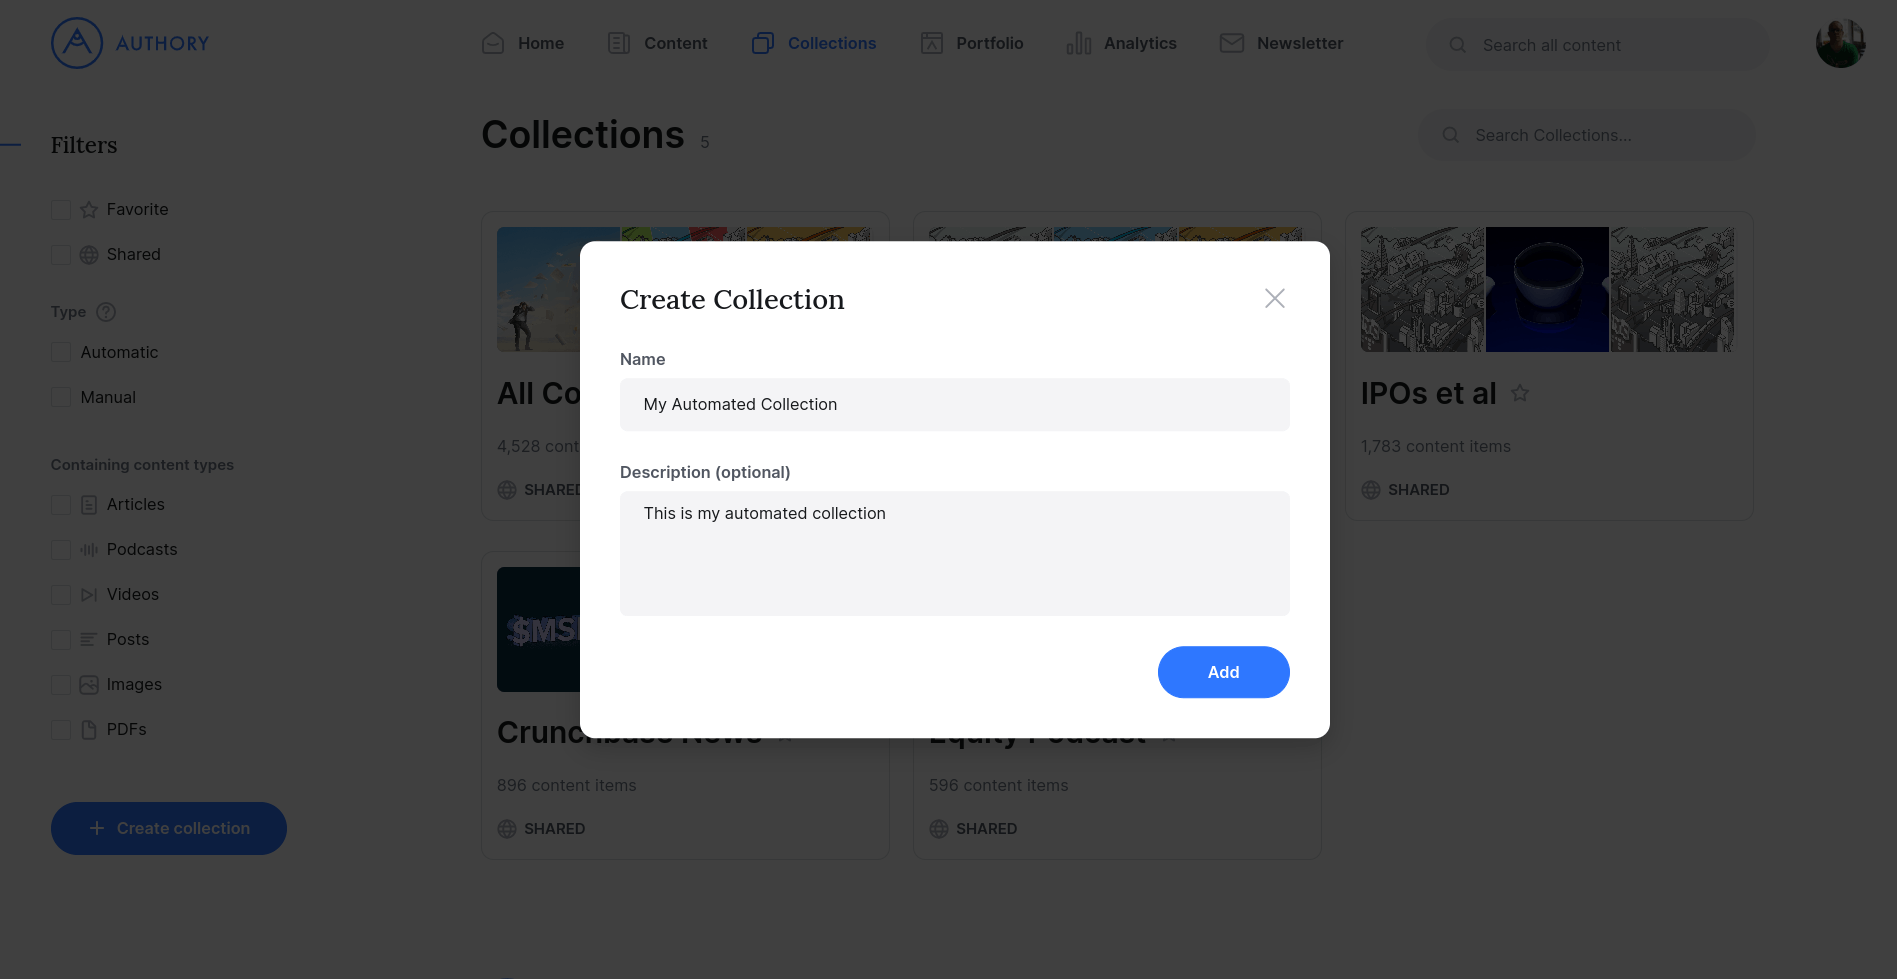
In the dialogue, enter a name and description for your collection. Click “Add” to create the collection. You can always change the name and description later on.
2. Add content automatically using rules
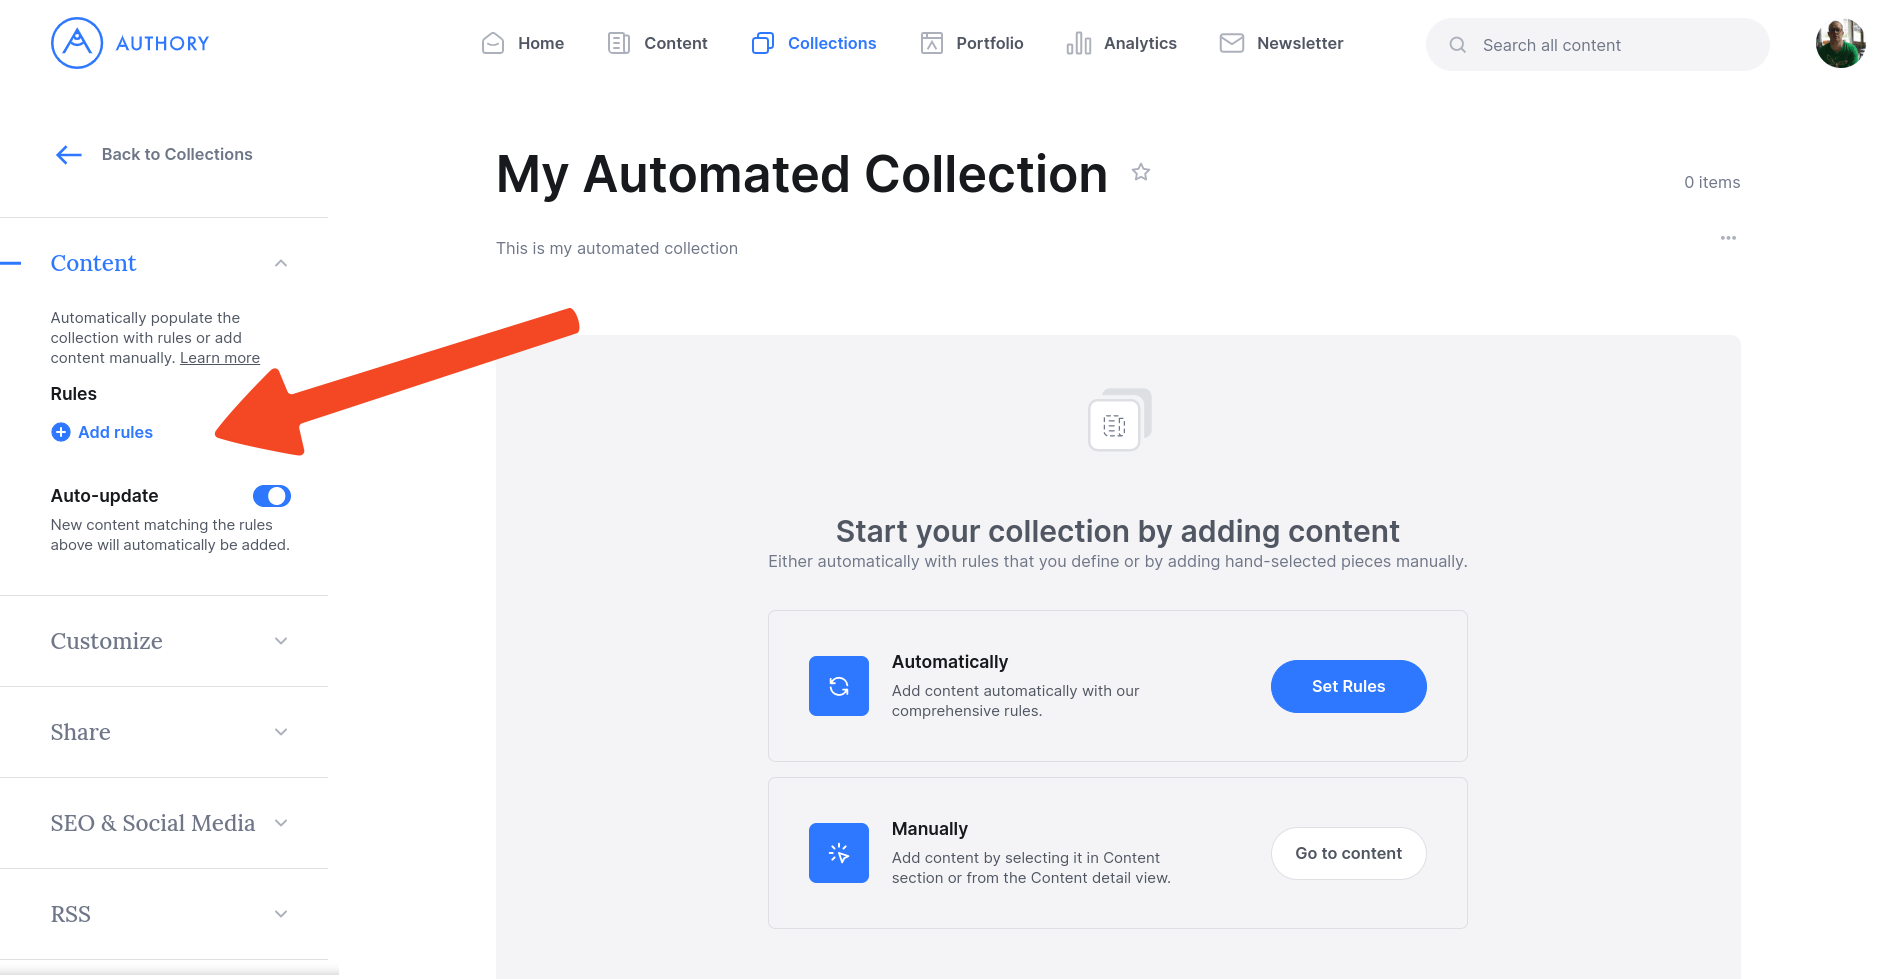
To add rules, open the Content panel in the sidebar menu and click “Add rules”. If this is a new collection, you can also click the “Set Rules” button in the center of the screen.
In the modal, you can configure which items should be automatically added to a collection. Updating these settings will update which items are inside the collection upon saving.
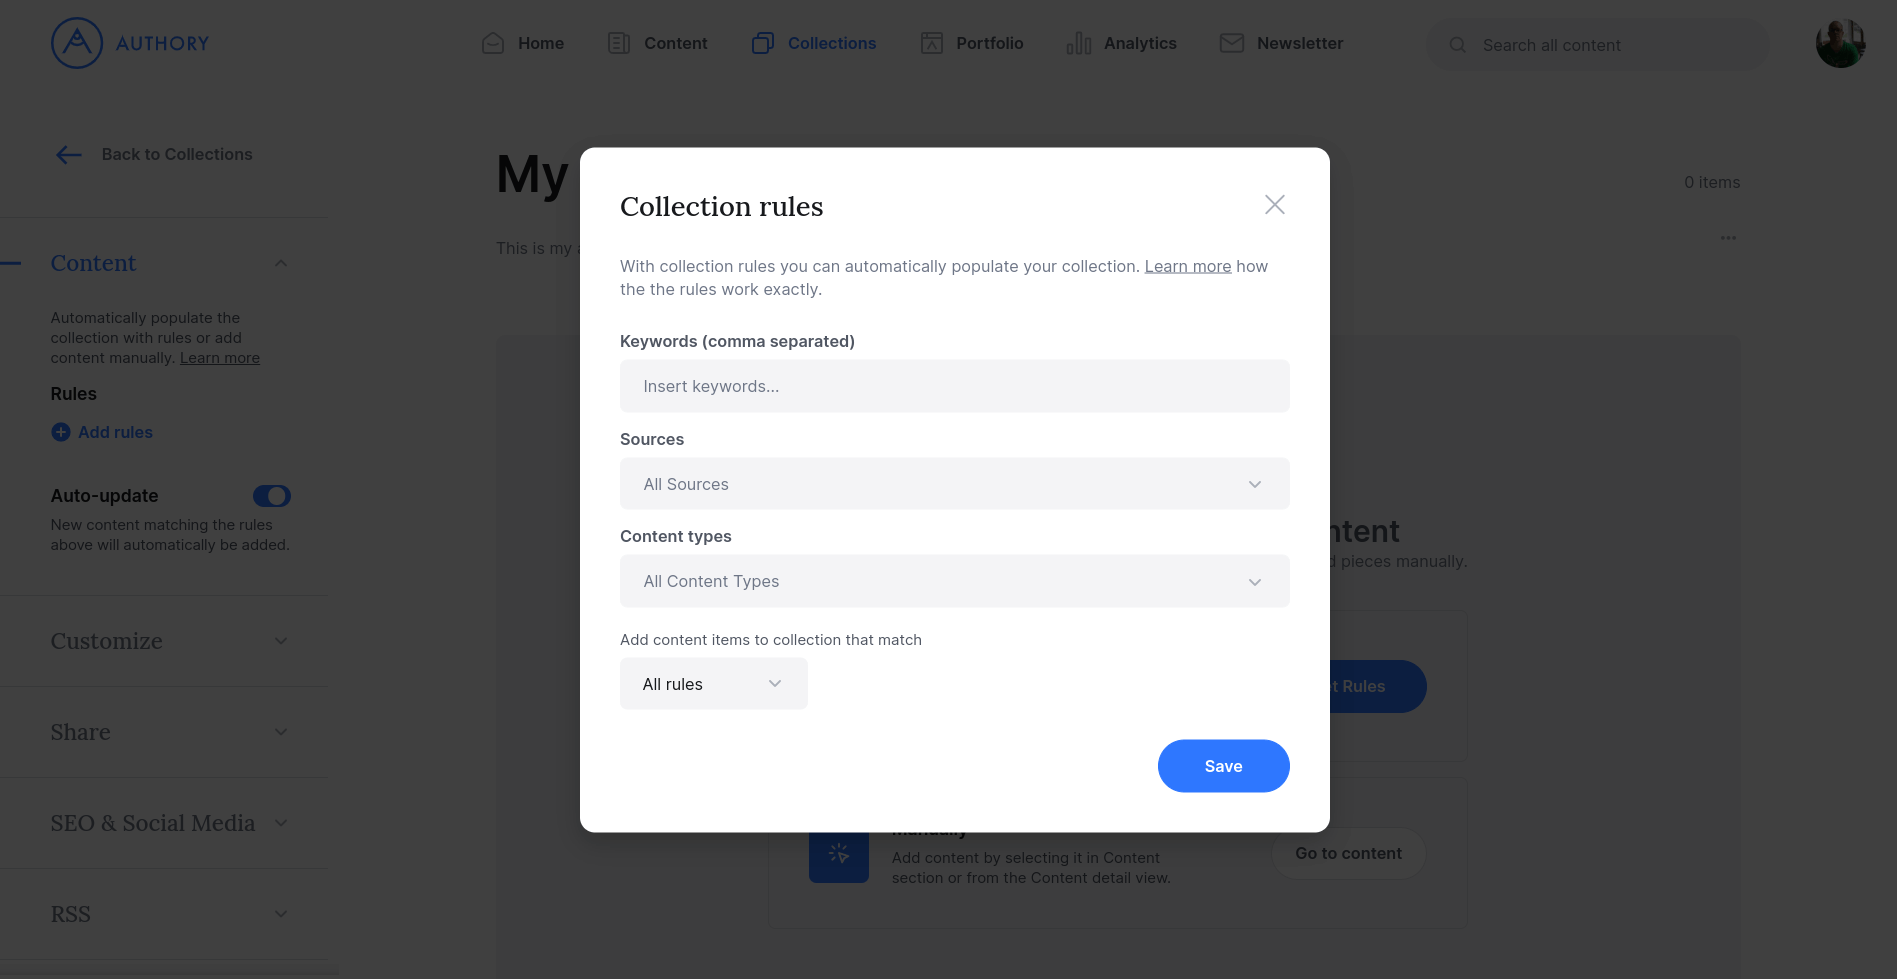
The following rules can be configured:
- Keyword matching: You can add one or more key phrases. If any of the phrases match, the item will be added to the collection. You can add multiple phrases by separating them with a comma. It is important to note that the full phrase has to match. For example, if you set the keyword “nutrition tip", all content items containing “nutrition tip” and variants like “nutrition tips” or “nutritional tip” will be added. If you set the keywords “nutrition, tip”, all articles containing either Journalism or Portfolio or both.
- Sources: You can set any number of sources. The collection will contain content from those sources.
- Content Types: You can set any number of content types (Article, Podcast, Video, Post, Image, PDF). The collection will contain all content with the given type.
If a rule is left empty, it is simply ignored.
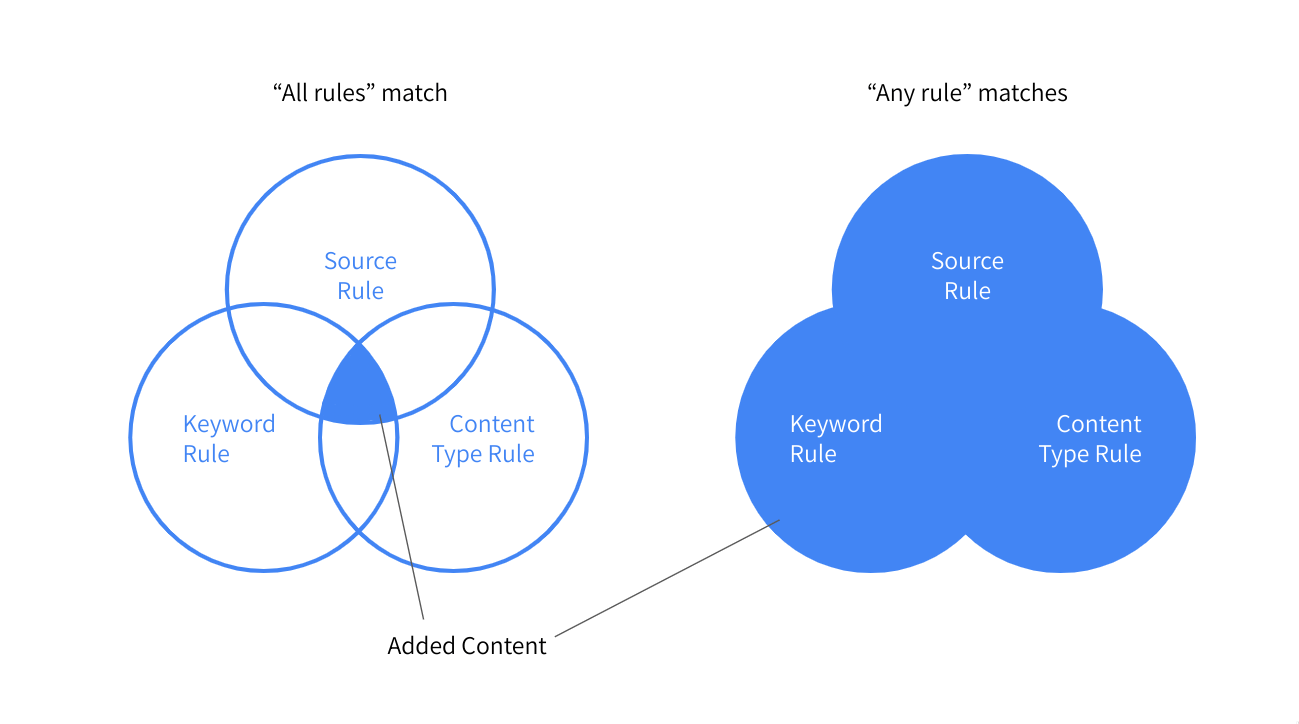
You can also configure how rules are combined using the drop-down menu at the bottom of the dialogue:
- Selecting “Add content items to collection that match All rules” requires all rules to match. For example, if you set “Journalism Portfolio” as keyword and “Authory” as source, all articles from Authory matching “Journalism Portfolio” would be added.
- Selecting “Add content items to collection that match Any rule” only requires a single rule to match. For example, if you set “Journalism Portfolio” as keyword and “Authory” as source, articles from Authory will be added, regardless of their keyword match. Also, any article matching “Journalism Portfolio” will be added, regardless of source.
You can further toggle if “Auto-update” is on or off. If “Auto-update” is on, the collection rules will automatically be checked against all content added in the future. If this is turned off, the collection will not be automatically updated. Toggling this switch does not remove or add any content.
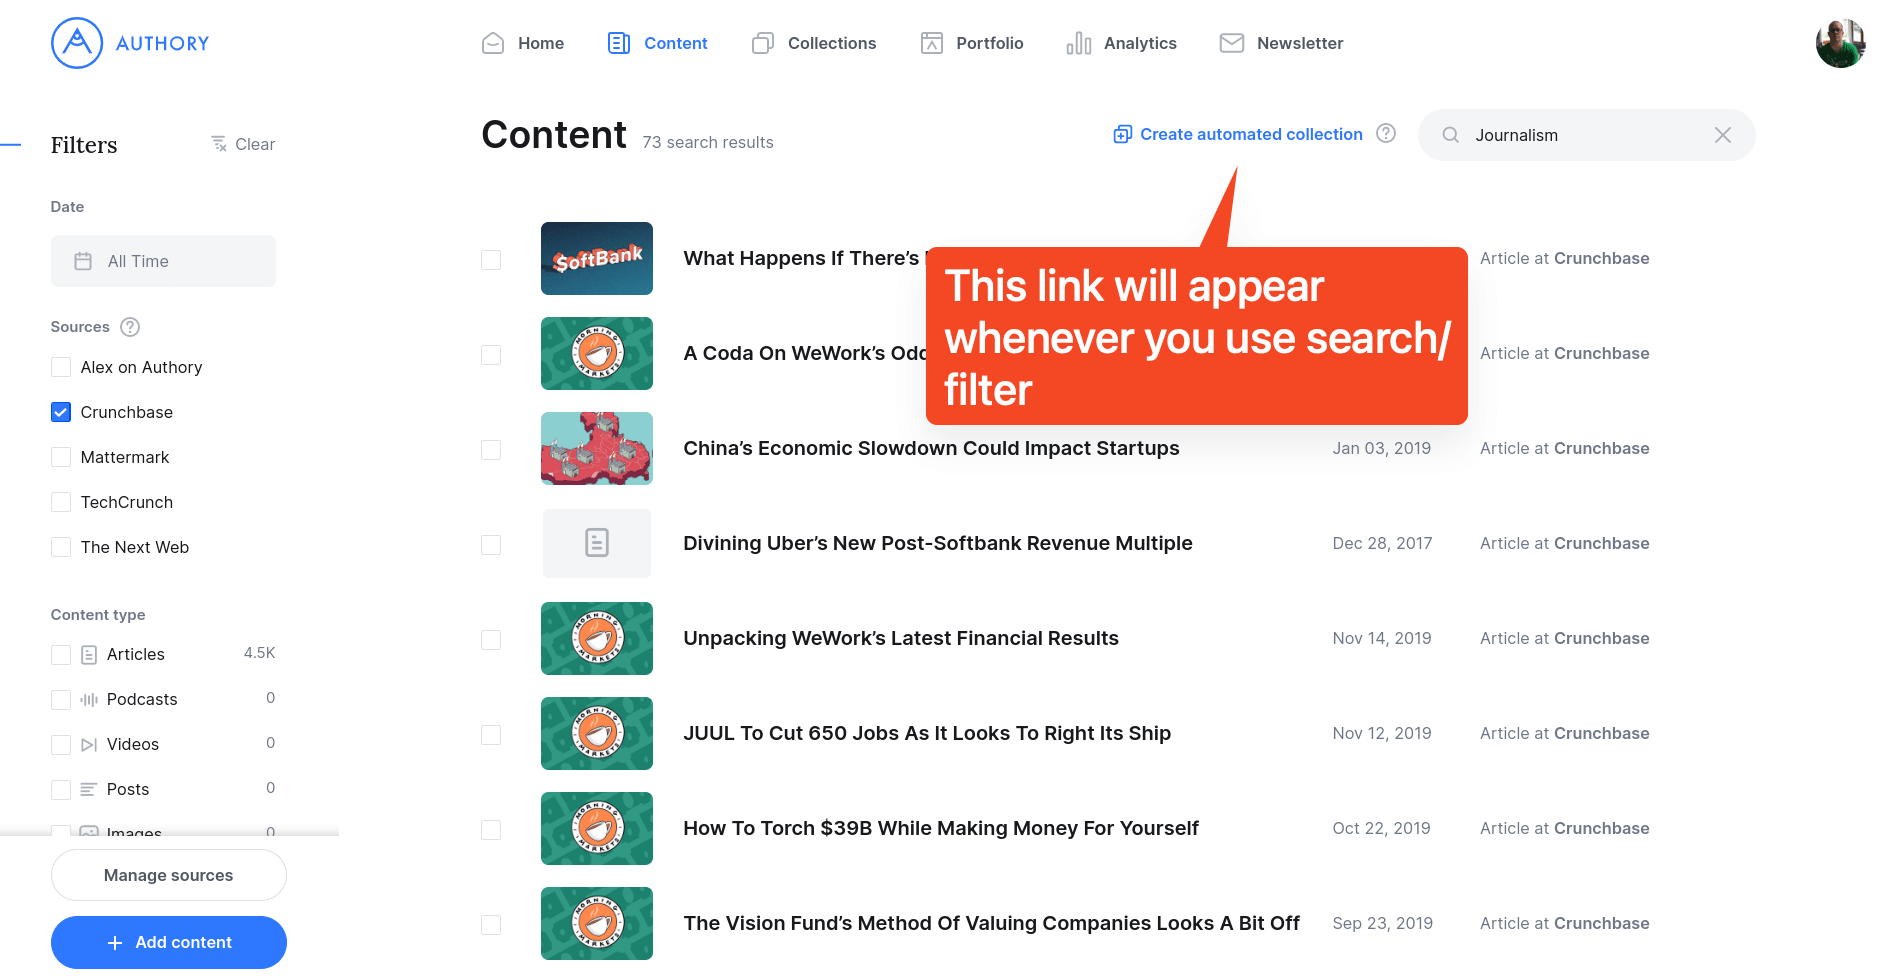
3. Creating collections from search results
Further, you can also create a collection from a search in your Content section. To do so search for the content you’d like to have in your collection, then press “Create automated collection” and enter a name and description. This will automatically setup a collection with rules that match your current search.
4. Adding and removing content manually
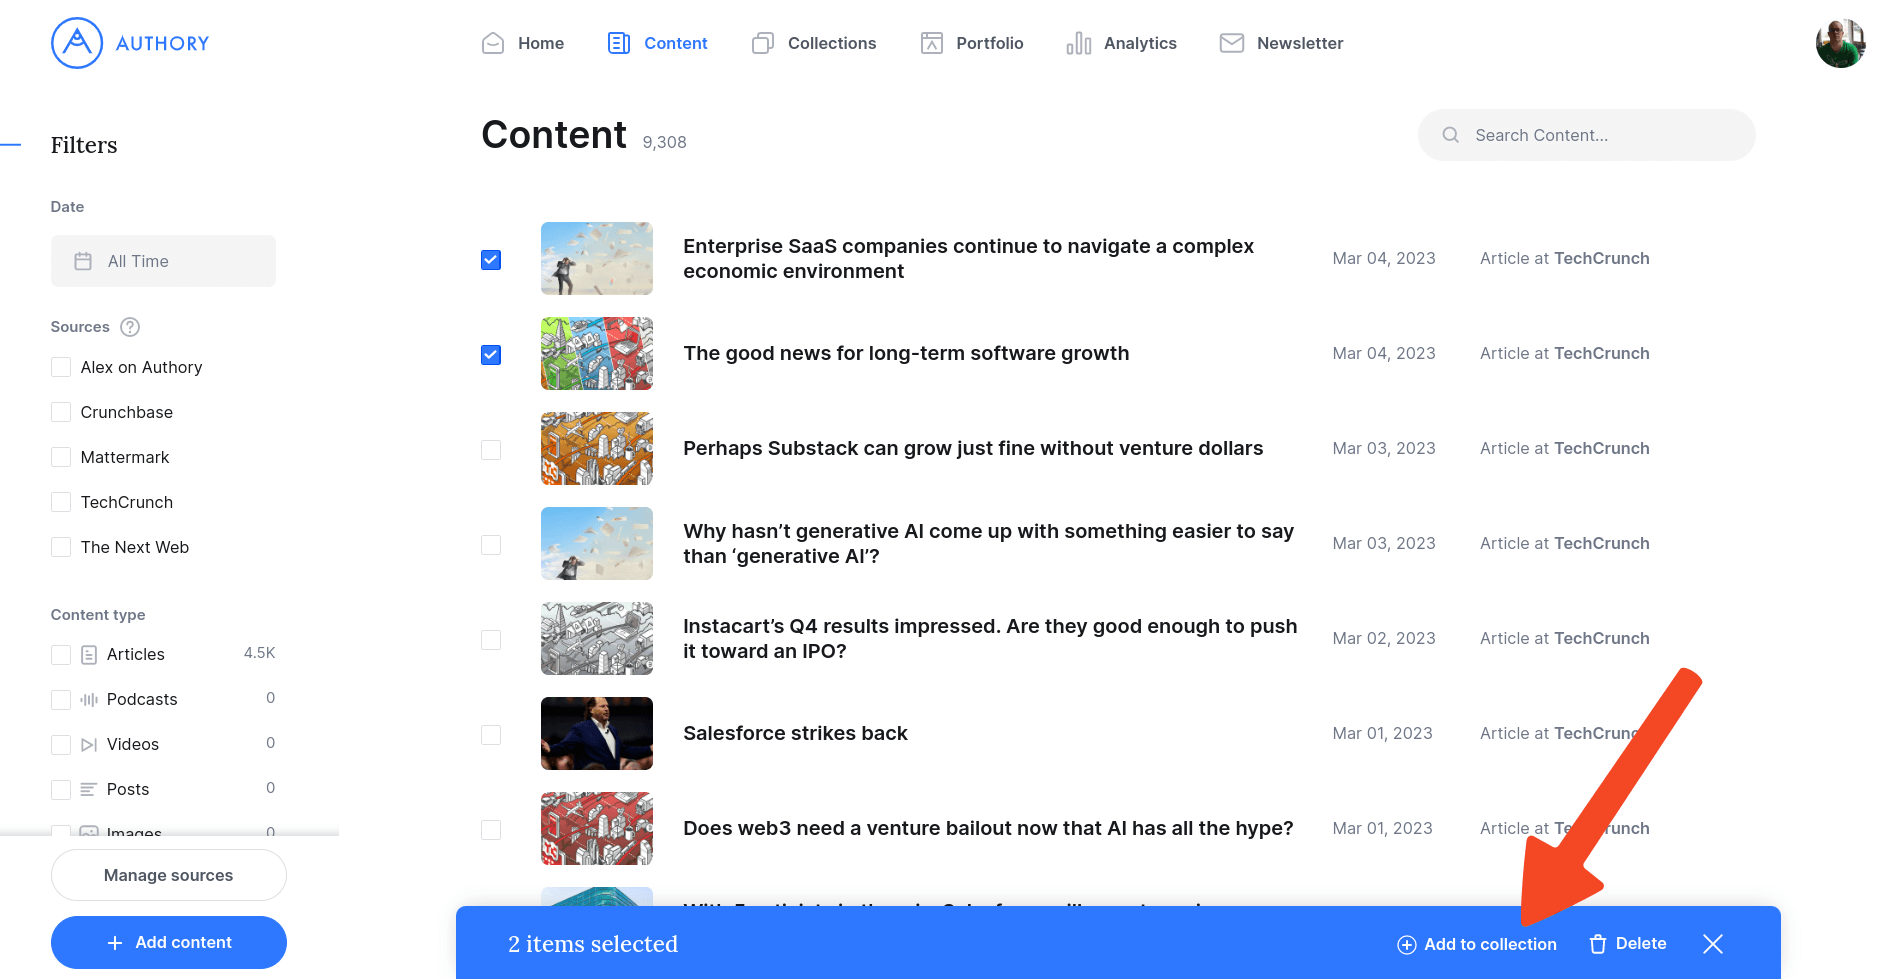
You can also add or remove content items manually. This can happen from the Content section in bulk or from Content details.
To add items in bulk, simply select them using the check box on the left side of each item in the Content section, then click “Add to collection”. You can select an existing collection or create a new one.
You can also add an individual item to a collection, or remove it from the collection. To do so, navigate to the content details. Open the collection panel on the left to access the settings.
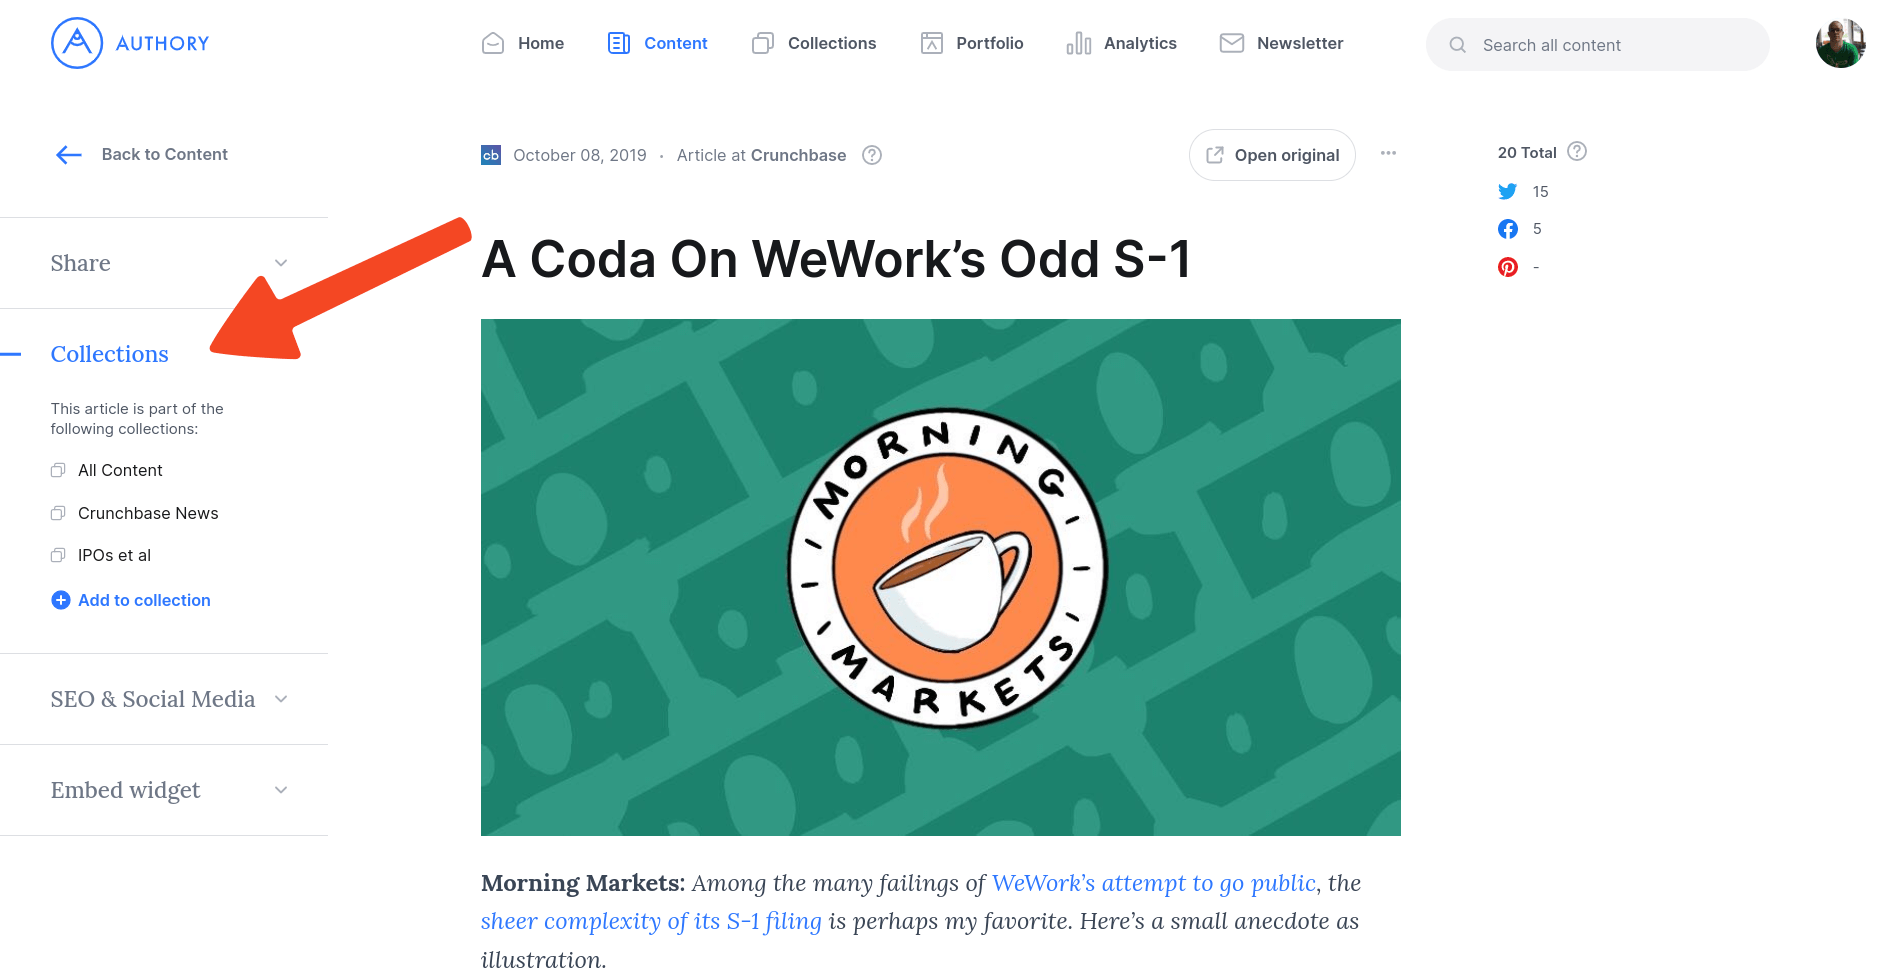
To add the item to a collection, click “Add to collection” and select the collection to add to. You can also create a new collection.
If you manually add an item to a collection, it will stay in the collection regardless of the configured rules or whether they are modified.
To remove the item from any collection, press the small x symbol next to the collection you’d like to remove the item from.
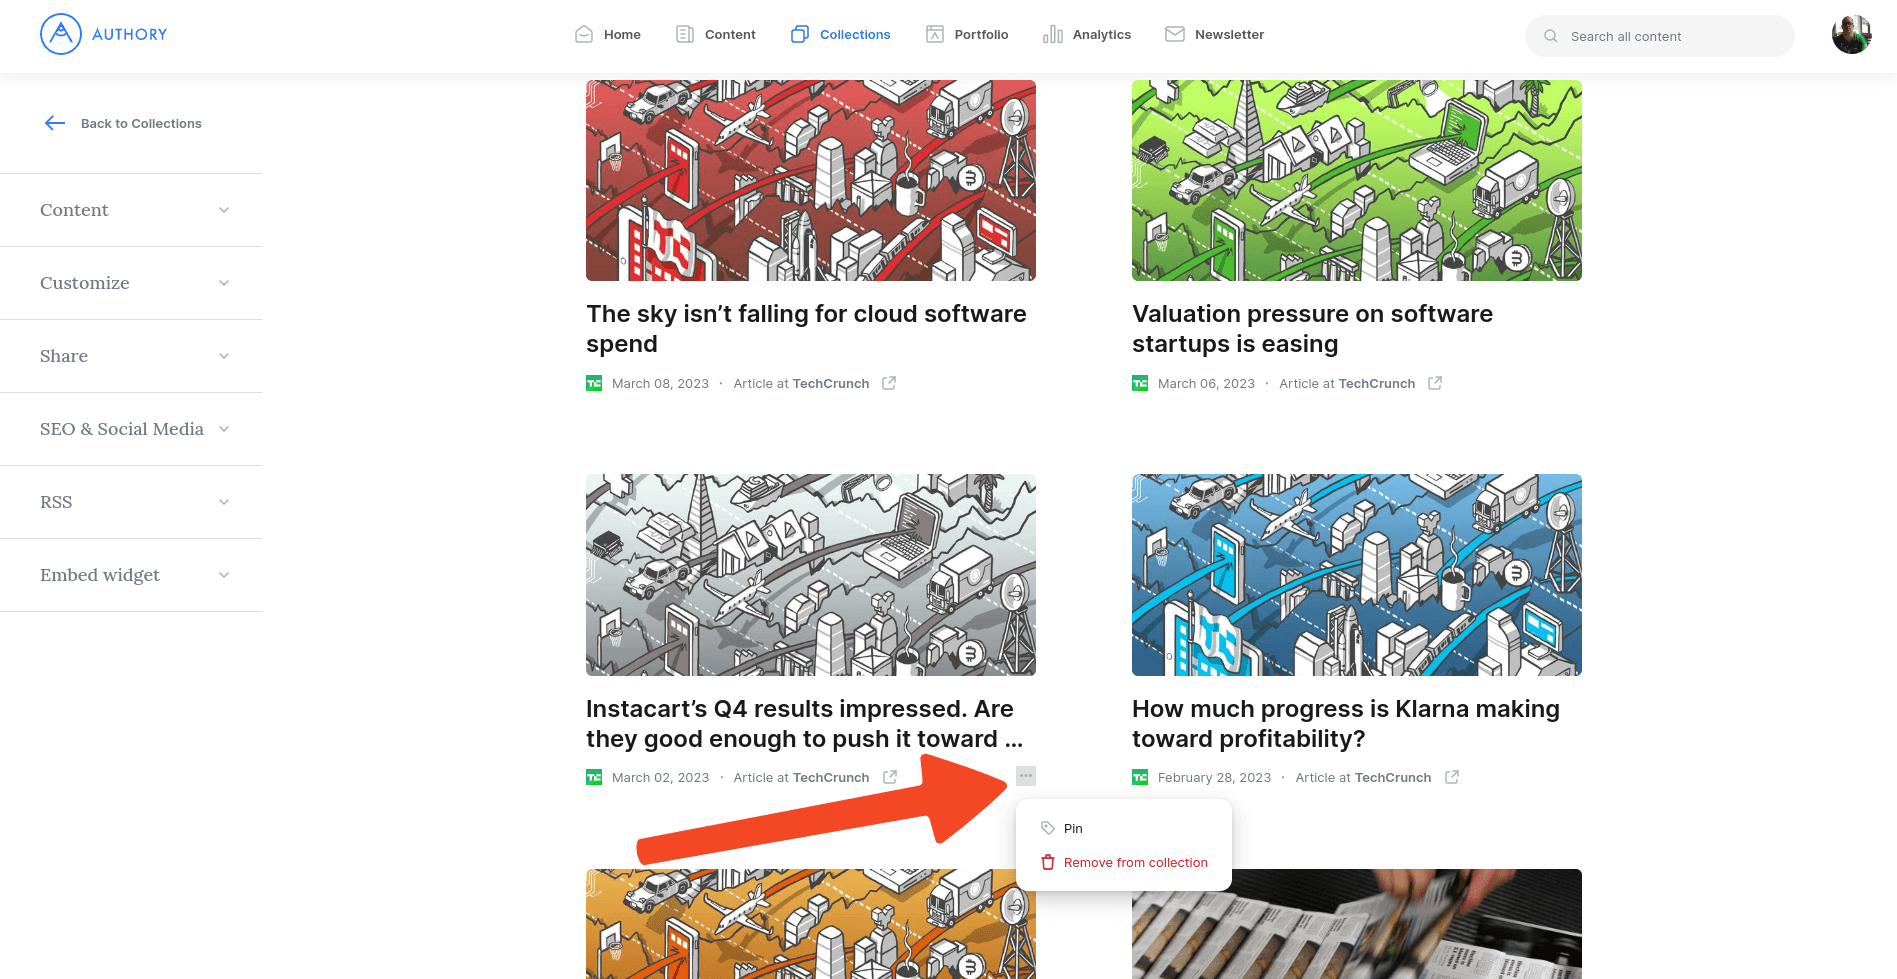
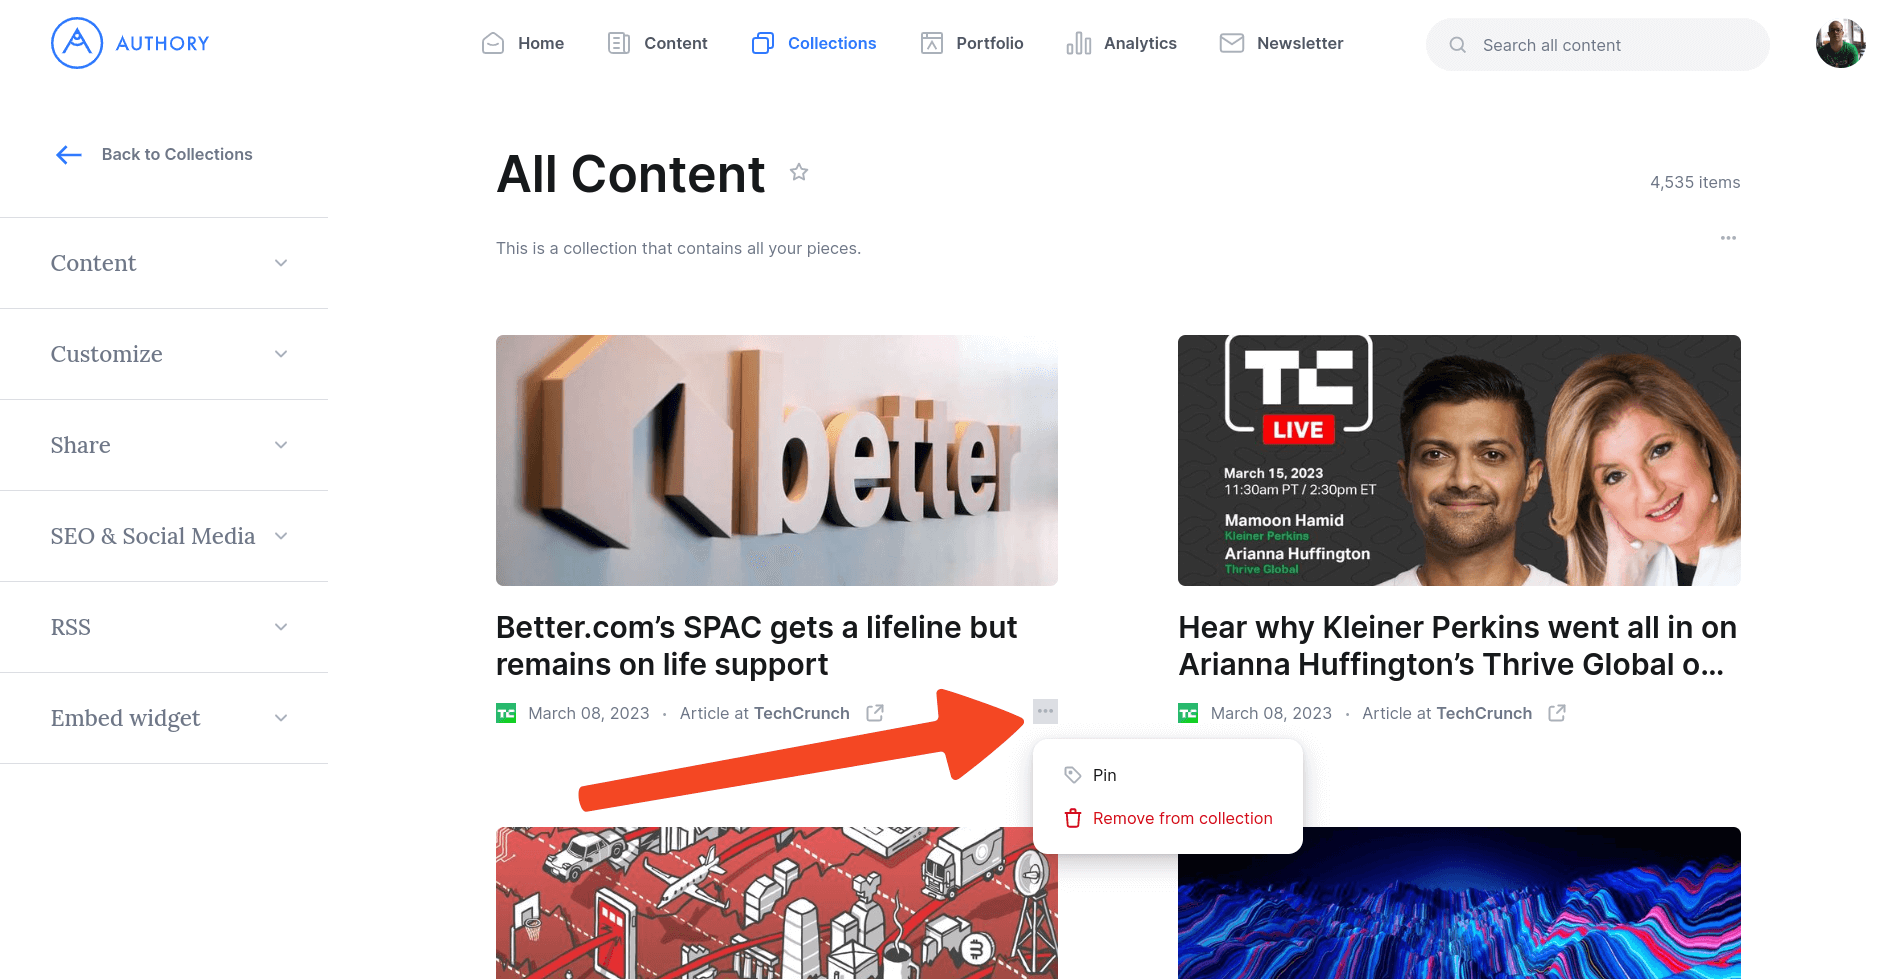
You can also remove an item directly from the collection settings. To remove an item, open the settings menu for the content item by hovering over the item and clicking the three dots.
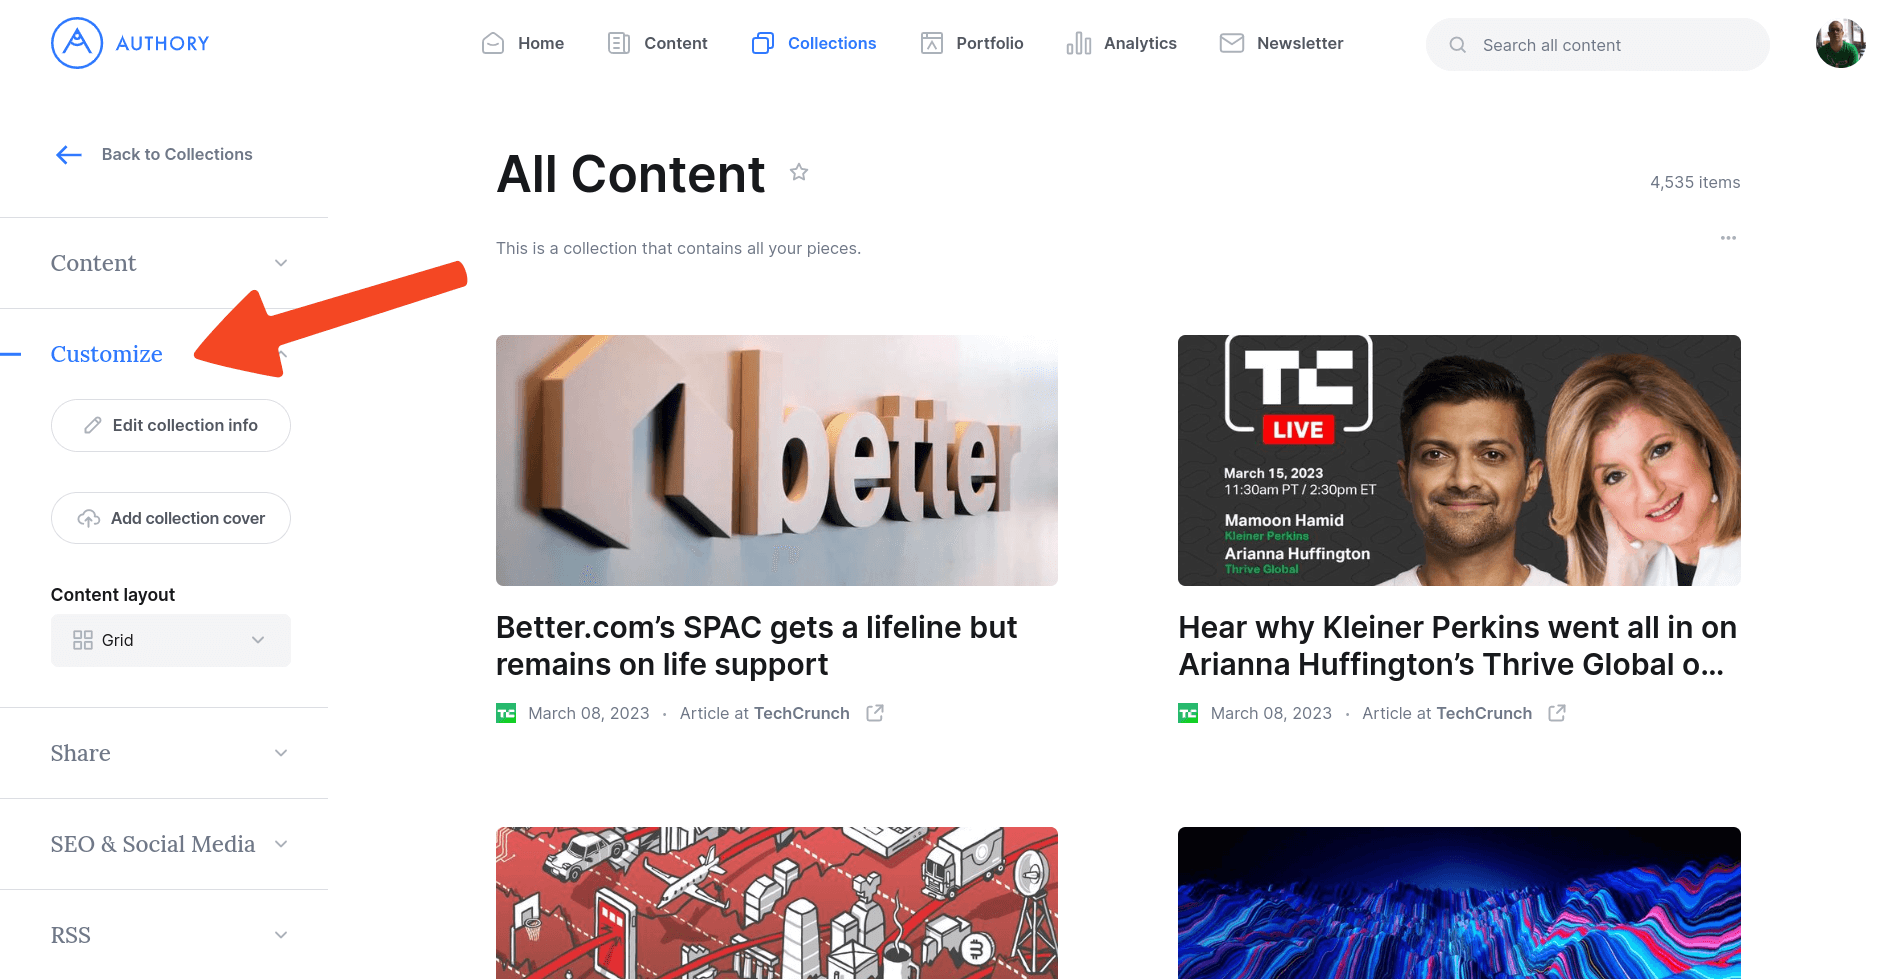
5. Customizing Collections
You can change the name and description of a collection in the Customize panel and also set different layouts to make your content look best.
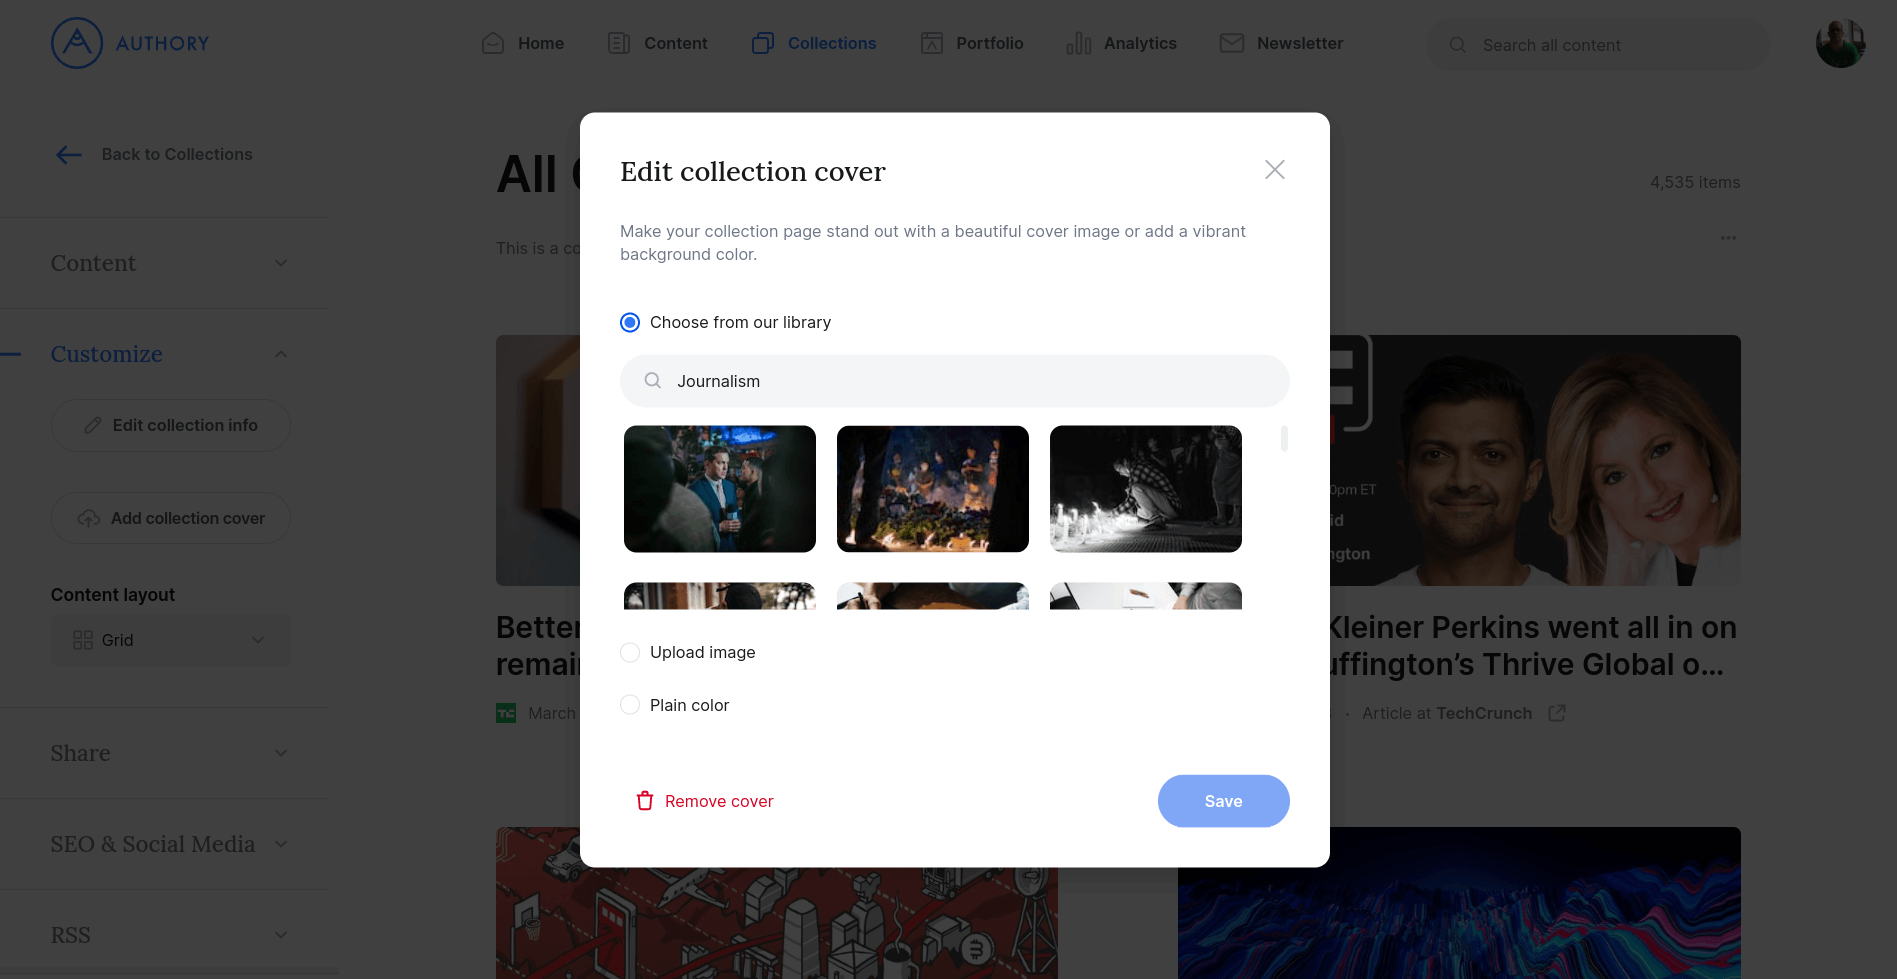
It is also possible to change the collection cover image or set a cover color. The cover is displayed when the collection is shared.
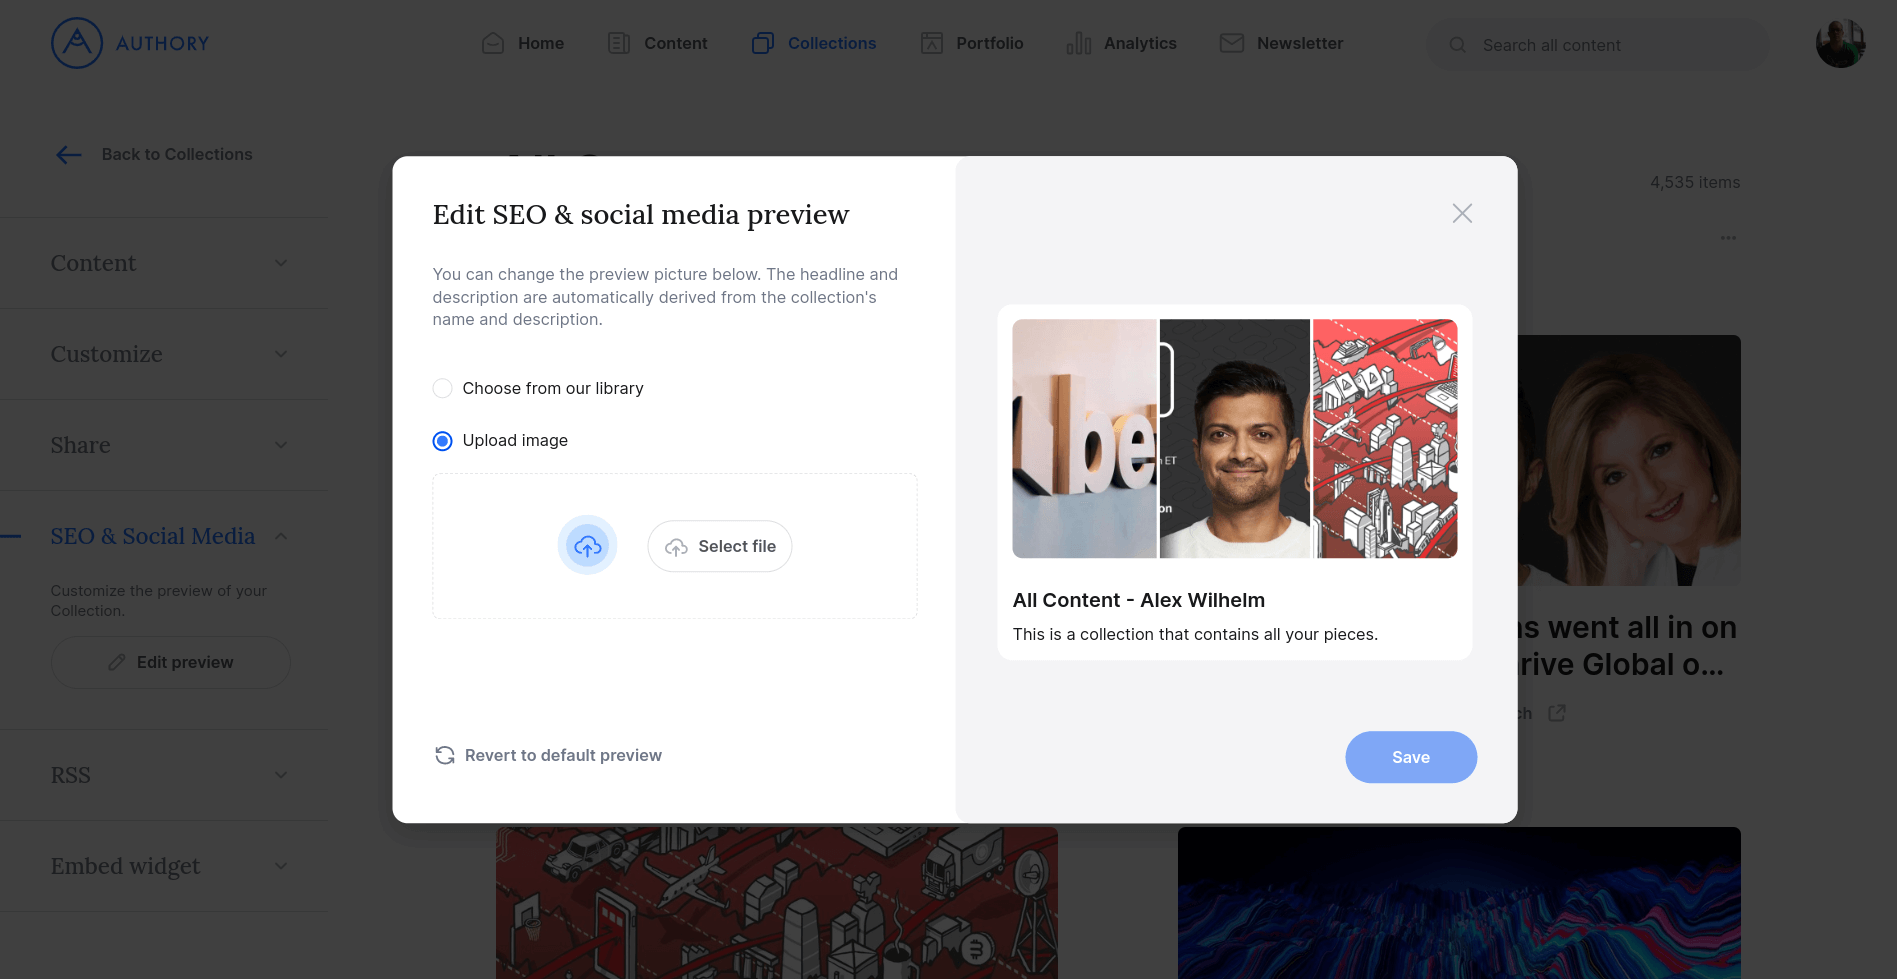
Further, you can fine-tune the social media preview for your collection in the SEO & Social Media panel. The image you configure will be used as a preview when sharing a direct link to the collection on social media like Twitter or LinkedIn.
6. Highlighting content items
You can pin a single item on top of your collection, regardless of the order of other items. To do so, visit the collection’s settings, then open the settings menu for the content item by hovering over the item and clicking the three dots.
Click pin to pin the item on top of the collection.
Content items that are pinned are highlighted when the collection is shown, or when the collection is viewed on your portfolio page.

7. Sharing your collection
Collections can be shared independently of your portfolio page. To share a collection, turn on sharing in the Share panel in the collection’s settings, where you will also find the collection share link.
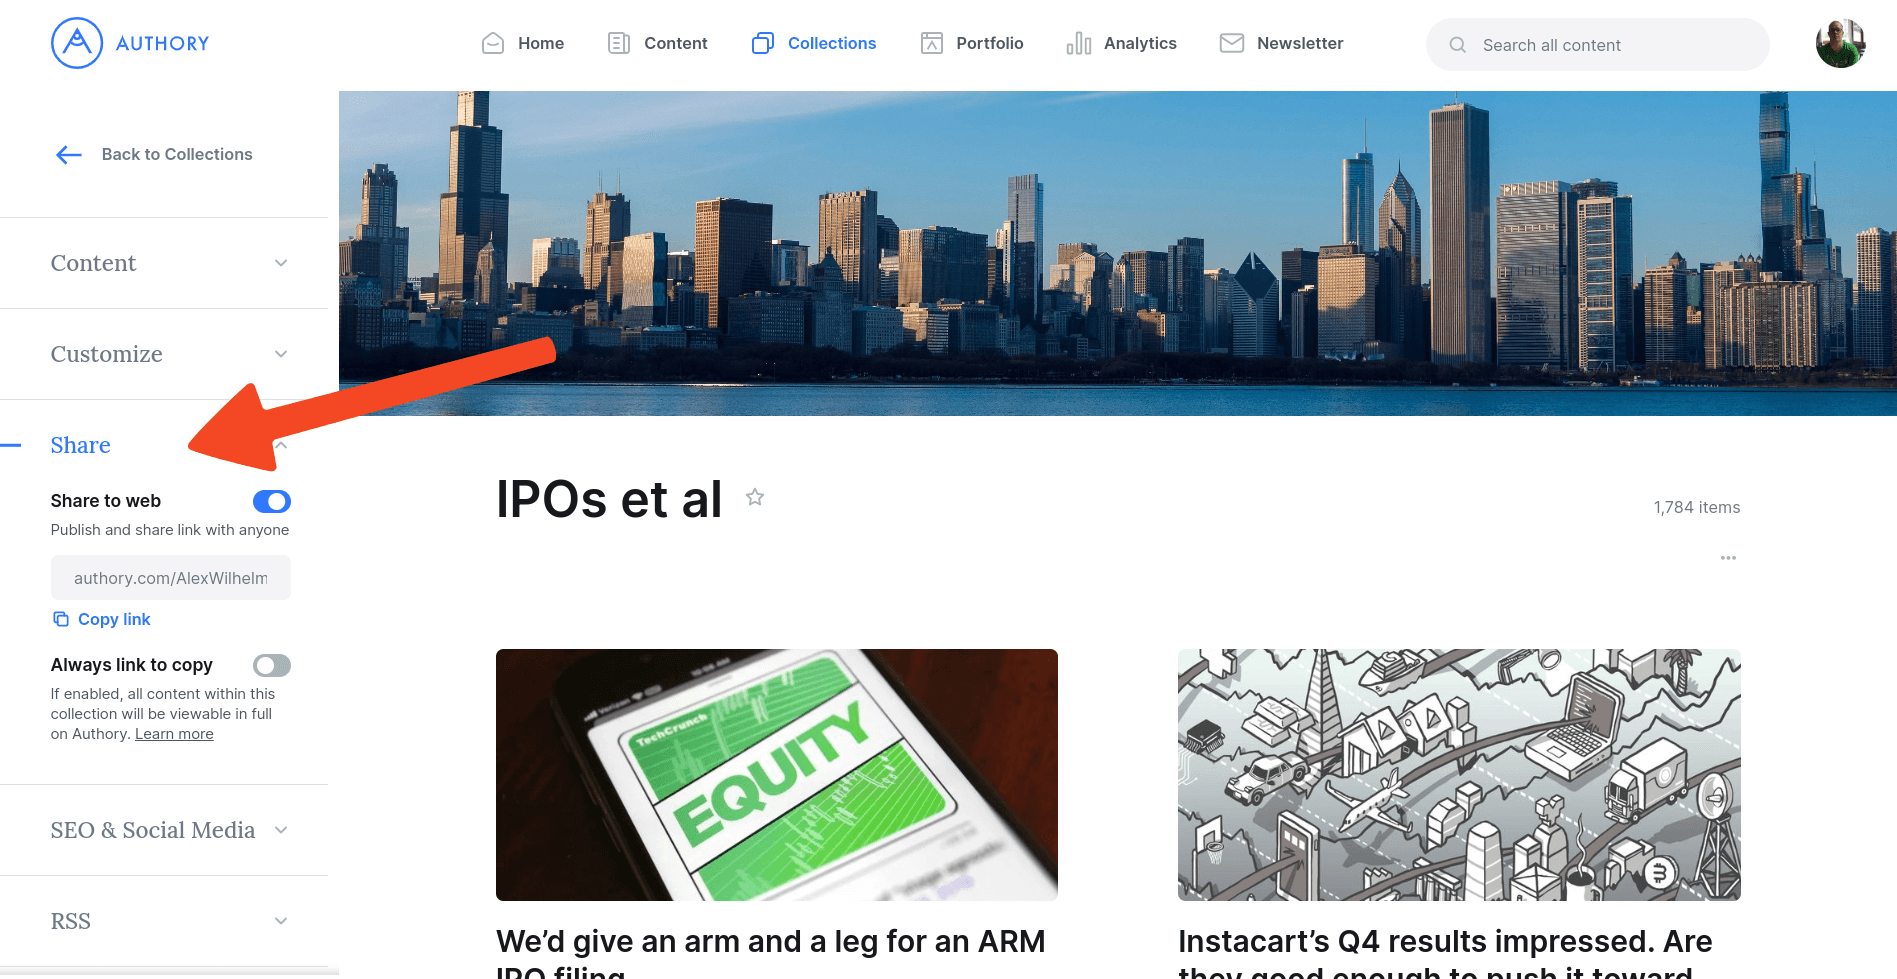
You can also configure if items in this collection should link to the full copy of the article, video or podcast stored on Authory. This is useful if you’d like to share a collection of your work with someone, for example a future employer.
If someone visits the collection share link, they will see an individual page with the content the collection contains.

8. Sharing via RSS or Widgets
Each collection comes with a dedicated RSS feed. You can find the link in the RSS panel in the collection settings.
The RSS feed allows easy integration with other tools, for example Notion or Airtable via Zapier.
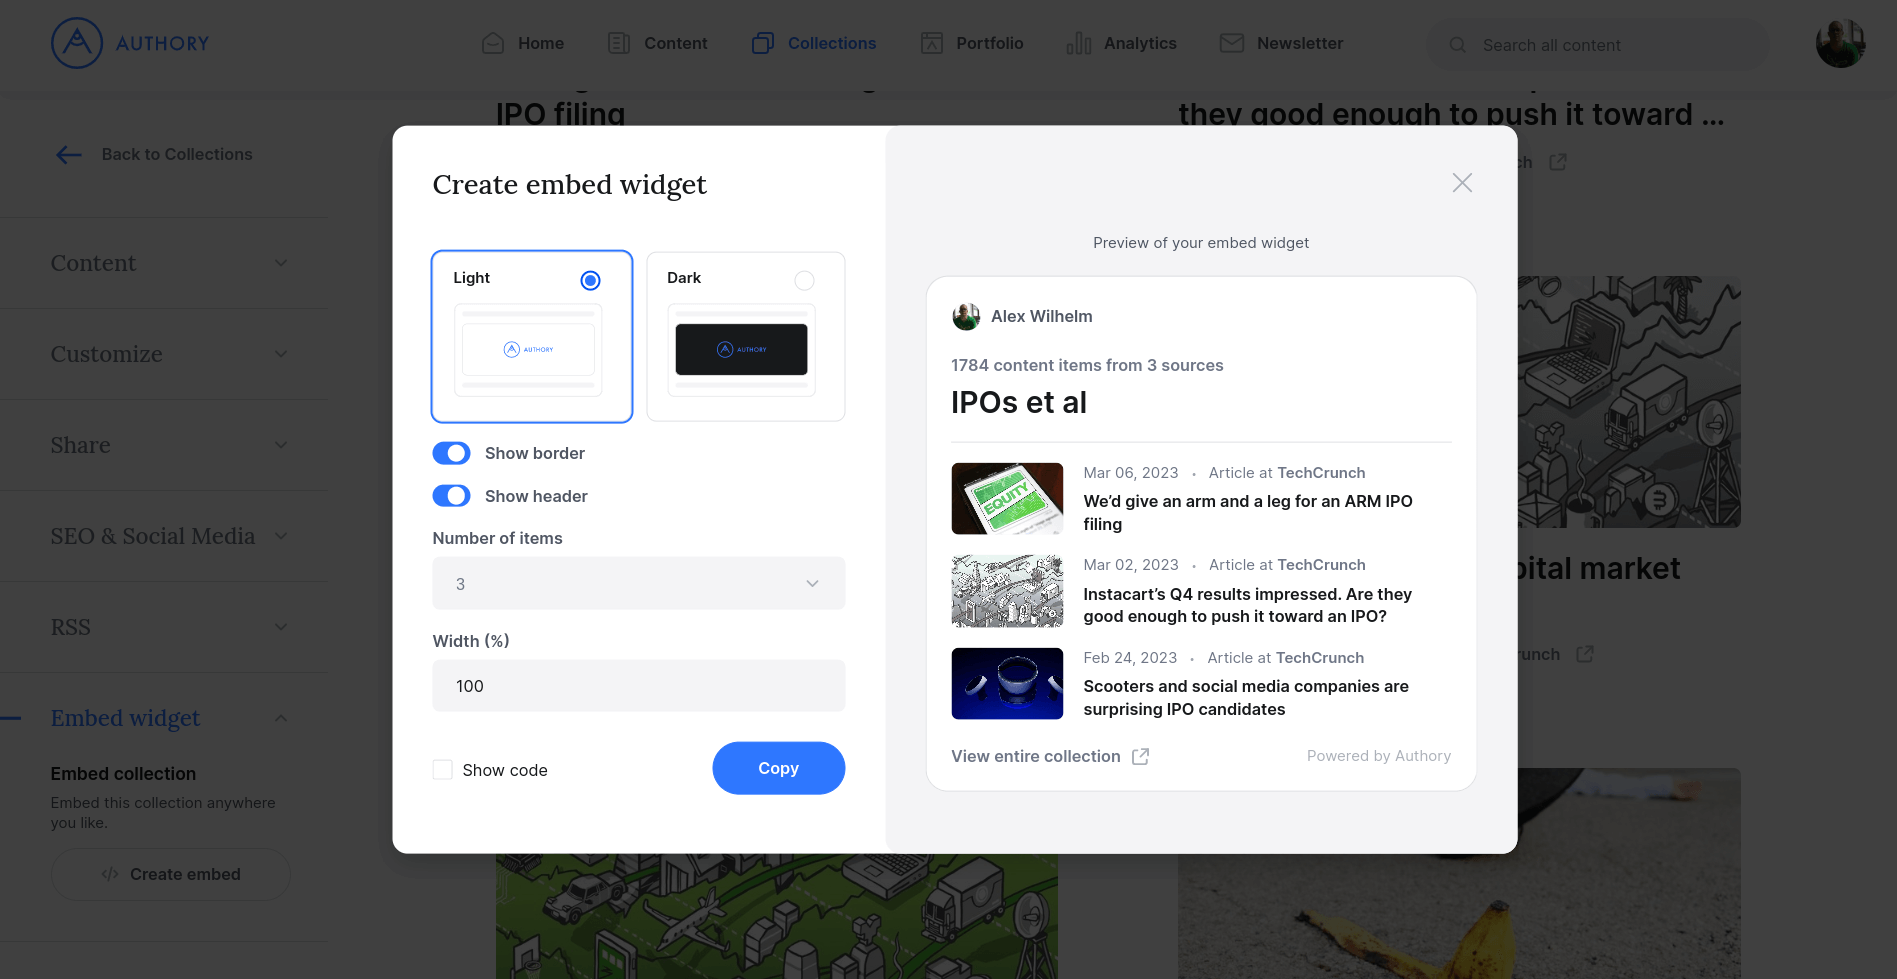
Authory can also provide a widget for the collection, which you can easily embed in any website. You can customize the style and size of the widget. Click the Copy button to copy the embed code into your clipboard. You can then paste it into any website to include the widget.
9. Adding collections to your portfolio
You can decide what content appears on your portfolio by adding collections. To add a collection, navigate to the Portfolio Section and open the Content panel in the sidebar menu.
Any collection added there will be visible on your profile. You can also change the order of collections by dragging.

For more information, read our tutorial on how to set what content is displayed on your portfolio.
10. Organizing collections
There is no limit on how many collections you have. To stay organized, you can search and filter for collections. Further, it’s also possible to star collections to mark them as favorite. This does not change how a collection is displayed to the visitors of your portfolio.

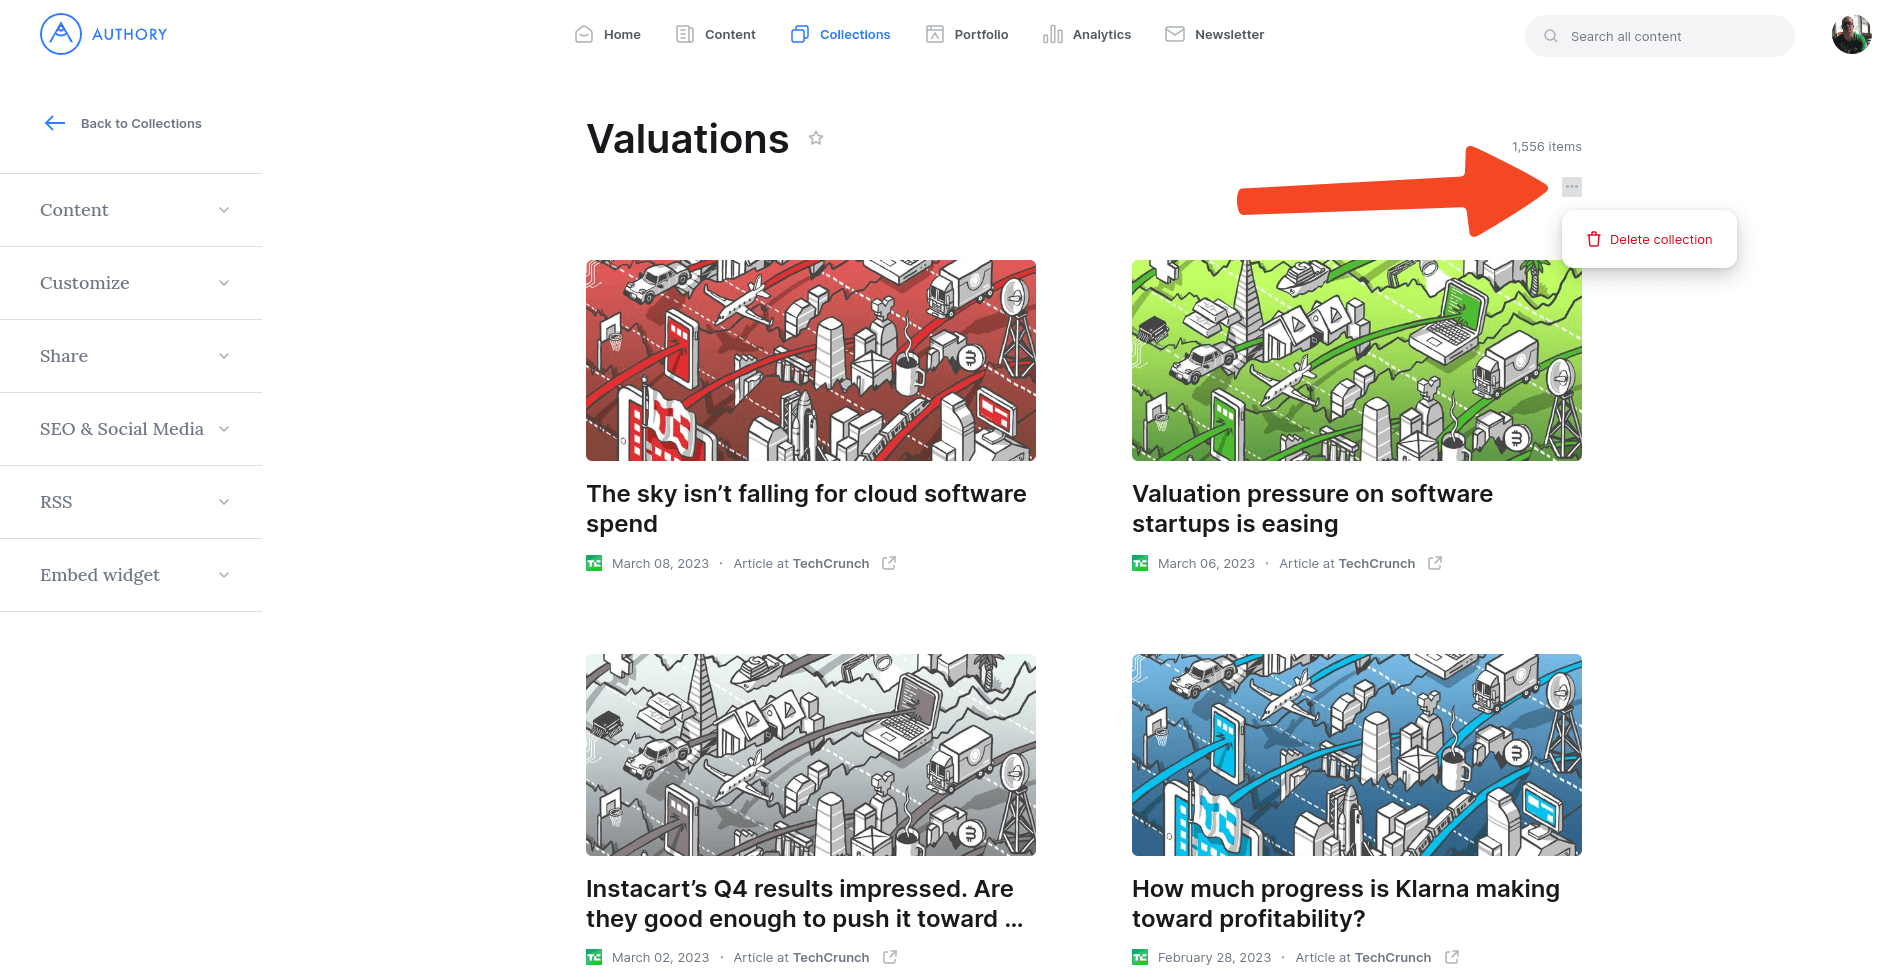
11. Deleting a collection
If you would like to delete a collection, click the settings menu in the collection details. Then click Delete collection.
Deleting a collection does not delete the content in it. However, it might change which content is visible on your portfolio page if the collection was added to your portfolio.